Adding Jira cards
You can add Jira cards to Jira tables but also to standard boards.
Warning
You need to be connected to the Jira instances related to the content you want to manipulate.
Note
When you add an issue to your board, its content is readable by every user who has access to the board, event if they do not have any permissions in the Jira project from which the issue comes from.
To edit a Jira card, you need the following permissions in Jira: Browse project, Edit issues, Link issues and have the option Issue linking actived.
To change the assignee of a Jira card, you need the following permissions in Jira: Browse project, Edit issue, Assign issue, Link issues and have the option Issue linking actived.
Tip
See this video on How to import Jira cards into a board.
Adding an issue to the board
Note
To add an issue to the board, you need the following permissions in Jira: Browse project and Create issue.
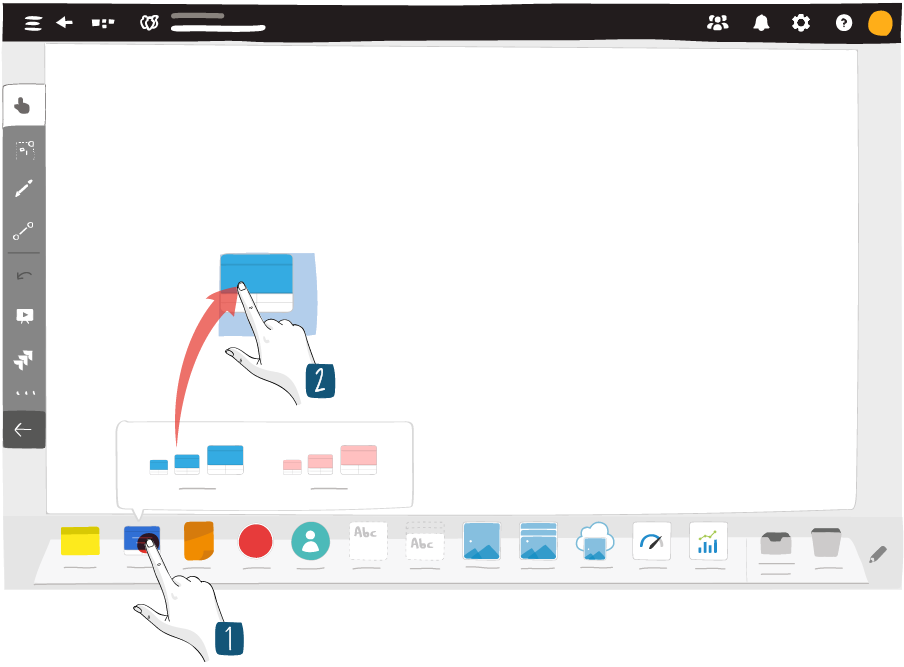
From your Jira table, click the Jira card tool.
Drag and drop a card on your board.
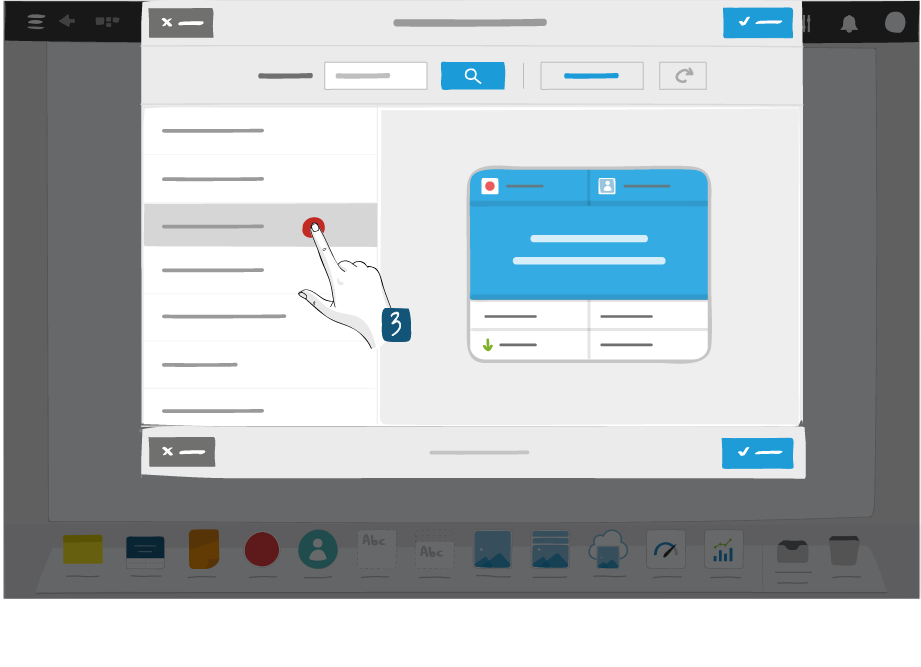
Select the issue to display in the Jira card.
Note
The Issues column appears empty.
Click the search button to display the 50 first issues of the project.
To search for a specific issue, enter the issue number and click the search button.
Tip
When searching for an Epic link to link to your issue, by default iObeya retrieves the fifty last modified Epic Links.
To search for a specific Epic Link, enter your project ID and the number of your Epic link (for example: PROJ-261).
The Epic link is a default field of the Jira card. Every user with access to the board is able to see if an issue has a parent Epic.
Click Save.
Note
In Kanban table and Sprint table Jira cards are automatically placed in the right cell. If none of the board values match the card’s, they are placed in the Undefined area.
On a standard board, Jira cards appear in its top left corner.
Cards that are already on your board are not added a second time to your board. To create a copy, see iObeya User Guide ‣ Synchronized Cards.
Creating a new issue from the board
Note
To create a new issue from your board, you need the following permissions in Jira: Browse project and Create issue.
From your Jira table, click the Jira card tool.
Drag and drop a card on your board.
Click Create a new issue.
Note
If mandatory fields in your Jira card are not supported as editable fields by iObeya, you will not be able to create an issue from the board. See: Supported Fields.
Click Create issue in Jira to be redirected to Jira.
Once created in Jira, refer to Adding an issue to the board.
Fill in:
Summary (mandatory)
Description
Assignee
Epic Link
Note
By default, iObeya retrieves the fifty last modified Epic Links.
To search for a specific Epic Link, you have to enter your project ID and the number of your Epic link (for example: PROJ-261).
The Epic link is a default field of the Jira card. Every user with access to the board is able to see if an issue has a parent Epic.
Other fields can be or must be filled depending on the Jira parameters.
If necessary, click Add a link and select:
- a link type,
- an issue.
Note
To create links between cards, you need the following permissions in Jira: Link issues and have the option Issue linking activated in Jira.
You can add multiple linked issues and different link types.
Click Save.
Your card appears on your board and is created in Jira.
Adding multiple Jira cards
Use this option if you need to import a large amount of issues from Jira at once.
Note
To use the bulk import feature, you need the following permissions in Jira: Browse project and Create issue.
To use the Jira Add-on at its full potential, configure your Jira Card tool.
See: Jira Card Configuration.
From Jira utility, click Bulk import.
Use filters to browse your issues.
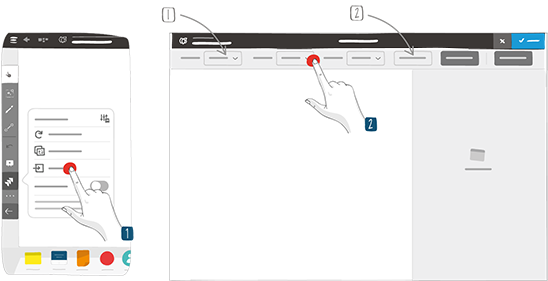
1 – Instance, project and issue type filter. You only have access to the instances that you are connected to.
2 – Advanced options (JQL and Jira filters)
Select the issues to import.
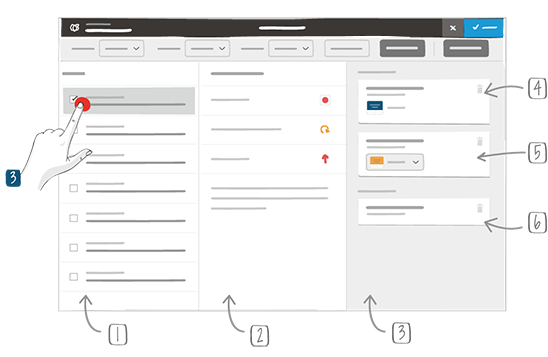
1 – Issue list
2 – Detail of the selected issue
3 – Basket of the issues that are added to the board
4 – iObeya automatically associates the issue with your Jira cards sharing the same instance, project and issue type.
5 – You may have to choose between different card types if they have the same properties.
6 – It is possible to add issues without pre-configuring a card first. They just appear as grey on the board.
Click Import.
Note
Jira cards are automatically placed in the right cell in Kanban table and Sprint table. If none of the board values match the card’s, they are placed in the Undefined area.
Tip
If your bulk import contains linked issues you can choose to display their links or not. To change your display mode, see: Configuring links display
Once imported to the board, your Jira cards might have different facets:

1 – Cards with a blue indicator
2 – Untyped cards
Grey cards, or untyped cards, mean that none of the Jira card types in the dock match the same issue type as the one(s) in the dock.
When importing multiple cards, only cards that are not already on the board are created. An already existing card will display a blue indicator at the top right corner that indicates the card needs to be updated. See: Updating Jira Cards.

1 – New card on the board
2 – This card was already on the board and requires updating