Preparing SSO on an iObeya platform - Step by step
This document describes the streamlined procedure to prepare the SSO configuration on an iObeya platform so the SAML authentication can be performed

This video explains also well how the SAML protocol works.
In most cases, it will work as is, but it does not cover all the possible configurations, nor does it explain all the parameters that are available. For additional information, please check the SSO parameters that are listed in iObeya documentation.
All the setup needs to be done through the iObeya Platform Administration graphical user interface.
Here are the basics tasks that needs to be handled between iObeya and the external IDP, though, in some cases, the SAML mechanism can be created on the IDP only once the mechanism has been created on iObeya:

1. Authentication policy configuration
|
Note It is mandatory to always connect to the iObeya Platform Administration by using the public URL of the server in order to configure your SSO. Accessing the platform through http://localhost for instance has to be avoided. |
1.1. Activation of SAML add-on
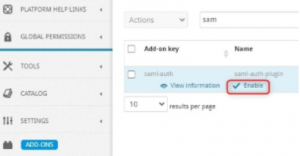
In the iObeya Platform Administration Graphical User Interface, once logged in, enter the “ADD-ONS” menu on the left. Find the “saml-auth” add-on and enable it if its status is “Installed”
1.2. Create a new authentication policy with 3 mechanisms

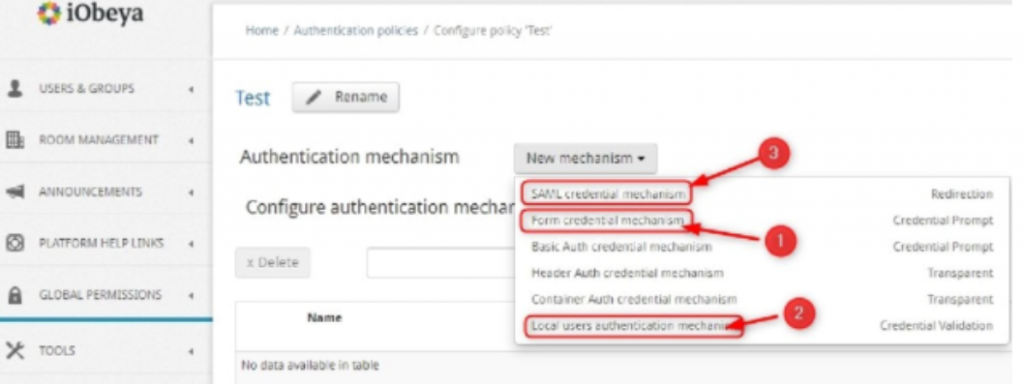
The Form credential mechanism is necessary if you want to keep the iObeya “default login/password" form. You can use the default values.
The Local user authentication mechanism is necessary to use local user accounts (e.g accounts created and managed in iObeya). You can use the default values.
The SAML credential mechanism is for SSO.
| Note If you put SAML credential mechanism first in the list, the SSO authentication flow will be used by default without showing the iObeya “default login/password”. However, it would be possible to access the “default login/password form” by using the direct URL https://iObeya-server-URL/login (if you access iObeya using https://iObeya-server-URL), unless you have deactivated or removed the Form credential mechanism from your authentication policy. |
1.3. Create a new authentication policy with 3 mechanisms
Edit the SAML credential mechanism
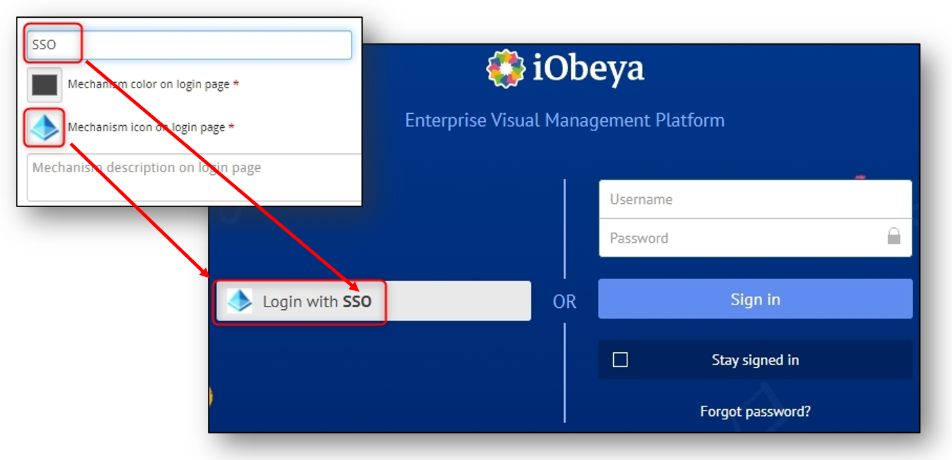
1.3.1. Give a name that will be displayed in the end-user login page and add the logo of your choice
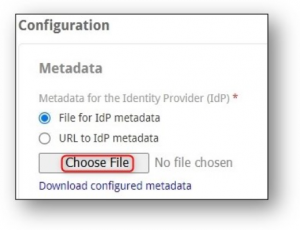
1.3.2. Import (choose file) the metadata file for the “Metadata for the Identity Provider (IdP)”, and the EntityID
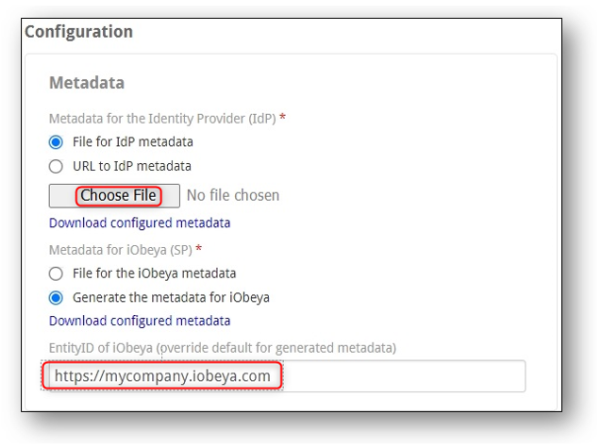
You will not be able to save that authentication mechanism if you do not provide a metadata file for the IdP.
So, if you already have the metadata of the Identity Provider (IdP), import it. But, if you don’t, you can ask us for a temporary dummy metadata file.
Check “Generate the metadata for iObeya”, and fill in the EntityID. It could be anything. Usually, we put the URL of the iObeya platform.
1.3.3. Generate a keystore, using the command in the Admin Guide (search for "Keystore file")
Here are the basic example provided using the tool KeyTool. Based on these command lines, the keys will have a validity of 1095 days.
keytool -genkey -keystore myKeystore.jks -alias myKey -keyalg RSA -sigalg SHA256withRSA -keysize 2048 -validity 1095
In that case, keyTool will ask to type in:
- Password for myKeystore.jks keystore, e.g. myKeystorePassword
- Domain name details: name, organizational unit, enterprise, city, state, country code
- The password for the myKey key, e.g. myKeyPassword
Then, in the iObeya “Key management form”, you need to:
- import the keystore file you have just created
- Keystore password: e.g. myKeystorePassword
- Passwords for the keys in the keystore (format: json object): {"myKey":"myKeyPassword"}
Name of the default key: myKey

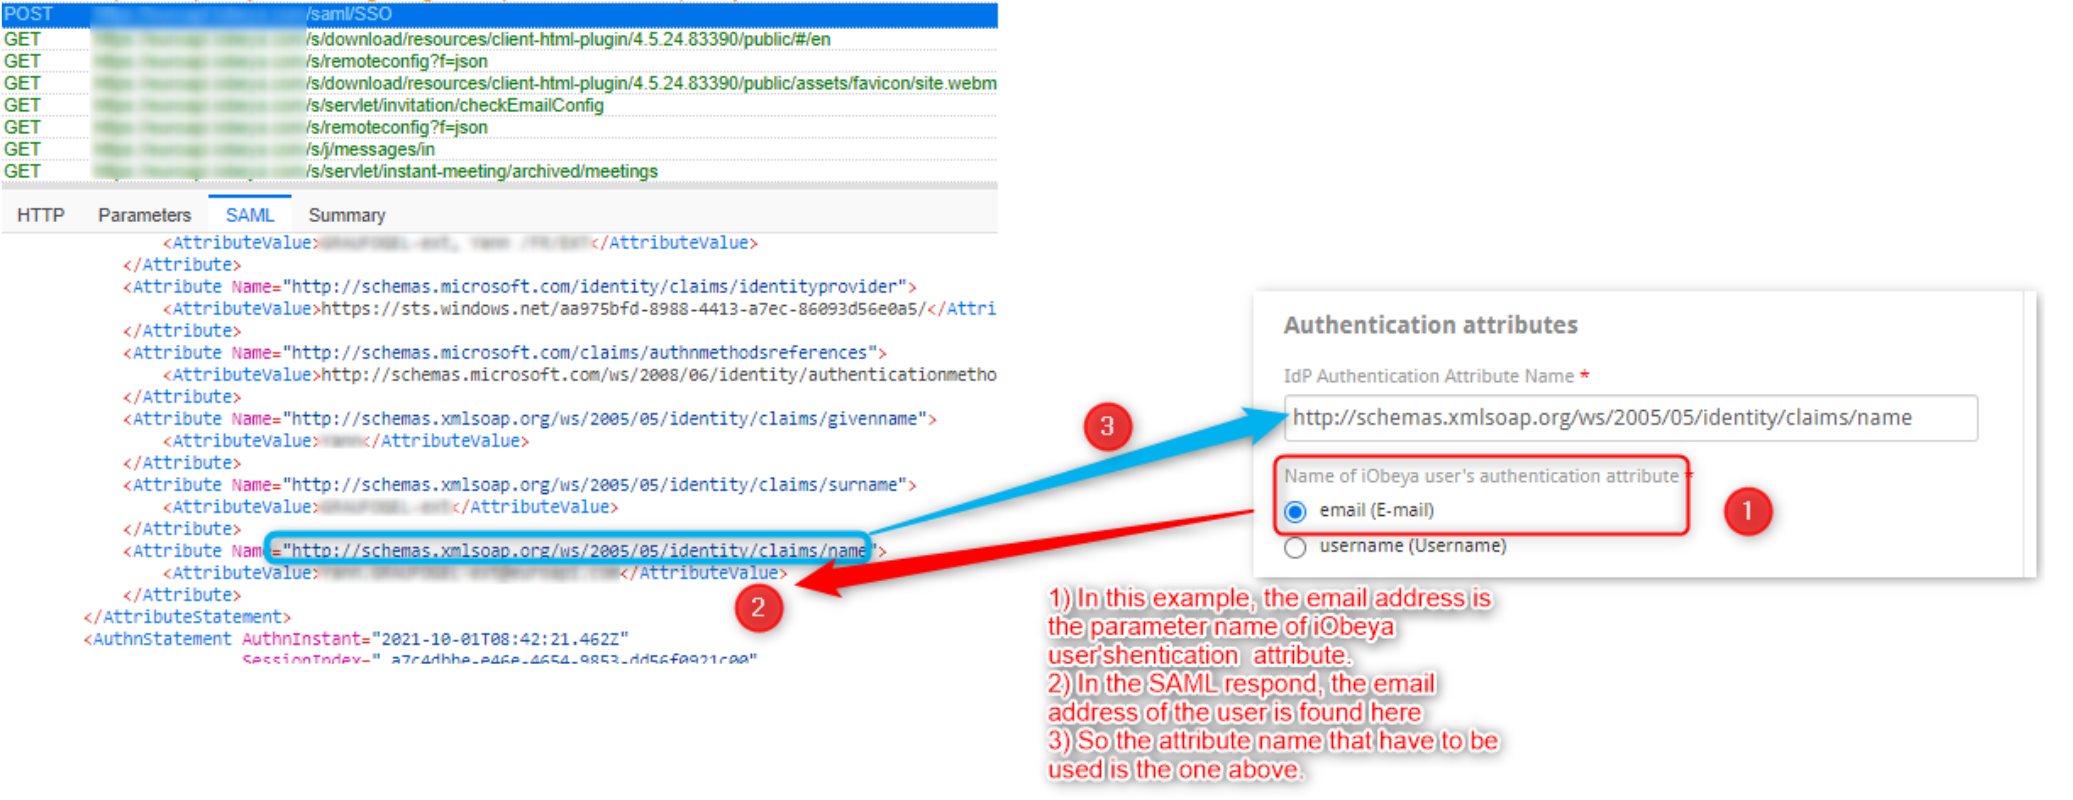
1.3.4. Fill out the “Authentication attributes”
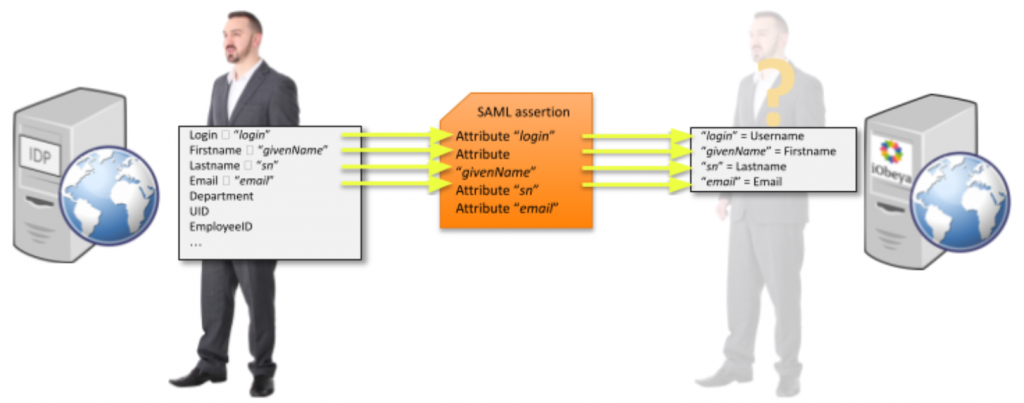
During the authentication phase, the user gets authenticated on the IdP, and then the IdP sends a “SAML assertion” to iObeya. That assertion contains some information about the user that iObeya is going to use to compare it with its local accounts.
For example, the user on the left is defined in the Enterprise Directory with his login, firstname, lastname, email, etc. And you need to configure the IDP so that it is going to send the right information to iObeya through the assertion.
That information needs to be passed as attributes.
Here is an example of an assertion (extract)
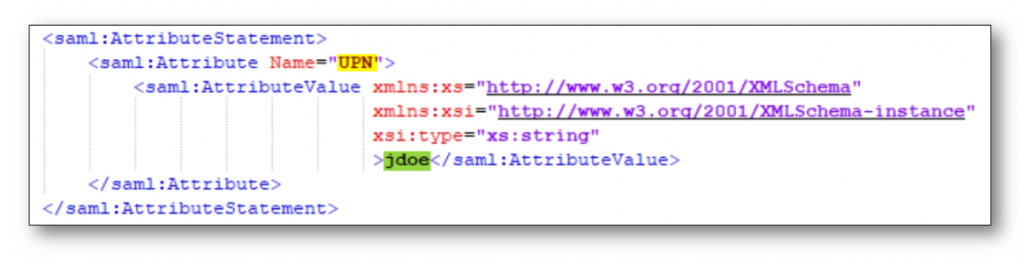
In this example, the assertion contains 1 attribute: Its name is “UPN”, and its value is “jdoe”.
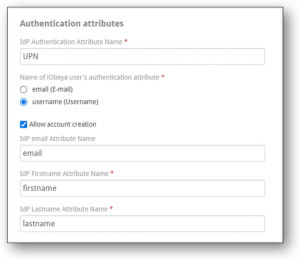
On the iObeya side, you would need to configure the “Authentication attributes” section accordingly:
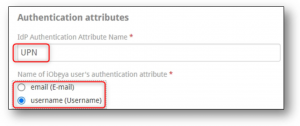
- You specify what attribute name to look for, e.g. “UPN”
- You specify if iObeya should compare that attribute’s value (e.g. “jdoe”) with the username or email of its local users.
In the previous example, if iObeya finds an account in its database that has “jdoe” as username, then it is going to log that user in.
Please note that the “IdP Authentication Attribute Name” needs to be passed as an “attribute” in the assertion. iObeya cannot use the “subject” field passed in the assertion.
Important ⚠ : if you use the email address to match the users, a part of (local part is, domain part is not) this authentication process is case-sensitive. Indeed, nobody should interpret the local part as it can only be understood by the domain owner (for example dots are ignored and match is case-insensitive for google accounts, but it might be different for another domain).
For example, let say the user John Doe has “John.Doe@MyCompany.com” as email address in the Enterprise Directory.
- If John Doe is declared in iObeya with “John.Doe@MyCoMPany.CoM”, then it would match
- If John Doe is declared in iObeya with “john.doe@MyCompany.com”, then authentication fails and a warning is displayed in logs.
1.3.5. (optional) Activate “Allow account creation” if you want self-registration
With that option activated, if a collaborator does not have an account on iObeya, the first time he/she clicks on the SSO button on the iObeya login page:
- He/she gets authenticated on the IdP
- The IdP sends all the necessary information to iObeya
- iObeya creates the account using the information transmitted
- The user is logged in on iObeya
In that case, you have to map iObeya’s fields to the attributes that are received, because iObeya needs to specify the username, the firstname, the lastname, and the email in order to create an account.
For example, you could configure, in the IdP, the following attributes (which are passed in the assertion):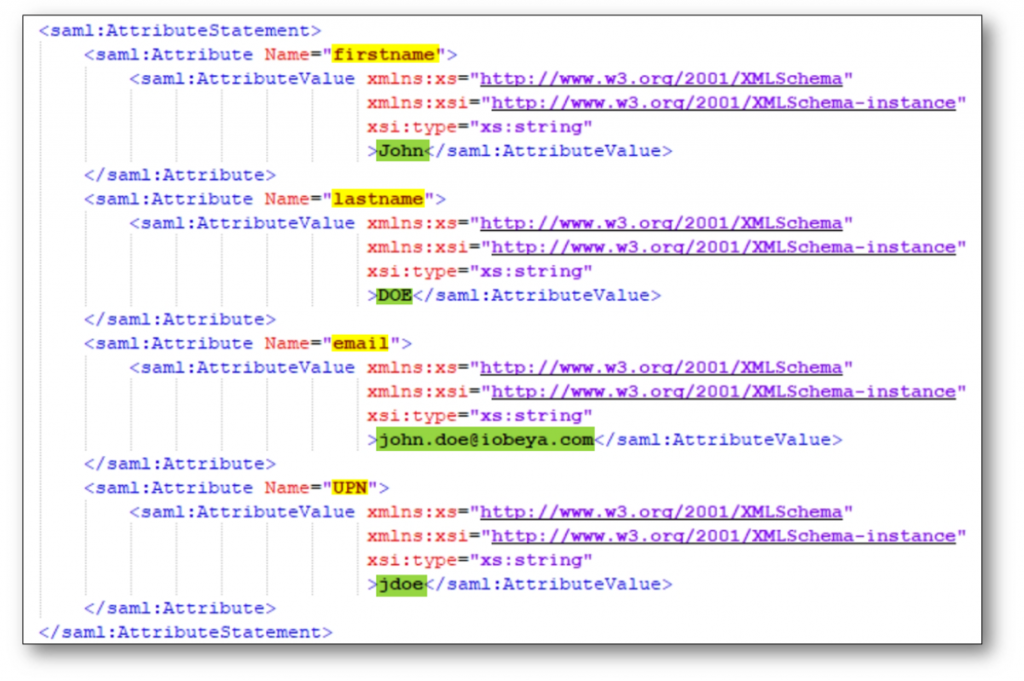
And you need to specify, in iObeya, what attribute name (yellow) to look for in the assertion, and where to map them (username, email, firstname, lastname).
In that example, the following user would be created in iObeya:
- Username: jdoe
- Firstname: John
- Lastname: DOE
- Email: john.doe@iobeya.com
|
Notes In iObeya, if you want the username to be set as the email address of the IdP, you could use the same attribute name both for username and for the email address, in the iObeya configuration.
If you are configuring SSO for Azure AD, the usual attribute names that you can configure in your IdP, and that you should declare in iObeya are:
If you are using the LDAP’s Object Identifiers - OID -, the usual attribute names that you can configure in your IdP, and that you should declare in iObeya are:
|
1.3.6. In the Additional Settings section
Unless you have a specific configuration (see the SSO parameters that are listed in iObeya documentation), you can keep most of the default values, but:
- You might want to increase the Maximum authentication age, especially if you get this error: “Response doesn't have any valid assertion which would pass subject validation”. With its default value (“7200”, i.e. 2 hours in version of iObeya < 4.5), if the user got authenticated on the IdP more than 2 hours ago, iObeya would consider that the authentication token is too old, and it would refuse to log that user in.
→ You could easily increase that value to 10 hours (“36000”) or even 20 hours (“72000”).
→ In most of the case, as more and more users use to never close their session, one uses huge figures in this section ; 8640000 is a value commonly used to be peaceful. This is the default value set in version of iObeya > 4.6.
- If you are configuring SSO for Azure AD or ADFS, uncheck the “Include scoping”
1.3.7. Save the configuration
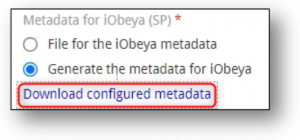
1.3.8. Downloading the iObeya metadata
Once this is done, reopen the SSO authentication policy you have just created (by clicking on “Edit information), right-click on “Download configured metadata” in the “Metadata for iObeya (SP)”, and use “Save link as…” option.
Then, you need to send the downloaded metadata XML file to the IDP administrator, so that they could import it into their IDP.
Note:
- Set the default RelayState to the iobeya home URL (https://[acme].iobeya.com)
- Be aware that iObeya will not read Subject and NameID from the SAML response, it only reads what is in the attributes section. Therefore the values you want to send to additional parameters will have to be mapped correctly.
1.3.9. Uploading the IDP metadata
Once the IDP administrator has uploaded the iObeya metadata into the IDP, and configured all the attributes/claims, the IDP administrator needs to download and send you the IDP metadata that you need to import in iObeya:
Please make sure the attributes / claim names declared on the IDP are declared exactly the same on the iObeya side.
Save the Authentication Policy.
1.3.10. Activating the Authentication Policy
Once this is done, you just need to activate the Authentication Policy you have just created.
| Note It will disconnect all the users currently connected, so they will have to reconnect. It is best to plan it during non-business hours, and/or to inform the users (email, announcement in iObeya). |
Please note that, when you activate the new policy, a pop-up window will appear with a URL. PLEASE copy that URL and save it, as this is the fallback URL, should you need to restore the default authentication policy.
2. Additional resources
2.1. SAML logs on the iObeya server
These logs will show you when people manage to log in, and also when they fail.
You should find, in the logs, for each AuthNRequest line, a AuthNResponse.
For example, when there is a success, you should find the email address in the response:
INFO [SAMLDefaultLogger] AuthNRequest;SUCCESS…
…
INFO [SAMLDefaultLogger] AuthNResponse;SUCCESS... jdoe@mycompany.com...
For example, when there is a failure:
INFO [SAMLDefaultLogger] AuthNRequest;SUCCESS...
...
INFO [SAMLDefaultLogger] AuthNResponse;FAILURE...
If the file does not exist in the logs, here is how to activate SAML debug information in the log files
On iObeya platform, log4j2.xml is usually located in the “settings” folder in the iObeya folder.
|
Note If you cannot find the file, go to the conf\Catalina\localhost folder in Tomcat, and open the .xml context file. The log4j2FilePath will give you the path to the file. |
Open that file and uncomment the following part, by deleting the “<!--” and “-->” highlighted in yellow
INFO [SAMLDefaultLogger] AuthNRequest;SUCCESS…
…
INFO [SAMLDefaultLogger] AuthNResponse;SUCCESS... jdoe@mycompany.com...
For example, when there is a failure:
<!-- DEBUG FILE LOG Console -->
<!--
 <RollingFile name="debugfile" fileName="/var/iobeya/logs/appDebug.log"            filePattern="/var/iobeya/logs/appDebug-%d{yyyy-MM-dd}-%i.log.gz">
  <PatternLayout>
   <Pattern>%d{yyyy-MM-dd HH:mm:ss} %5p [%c{1}] %m%n</Pattern>
  </PatternLayout>
  <Policies>
   <TimeBasedTriggeringPolicy />
   <SizeBasedTriggeringPolicy size="250 MB"/>
  </Policies>
  <DefaultRolloverStrategy max="5"/>
 </RollingFile>
-->
And add after <Loggers>
<!-- SAML -->
<Logger name="org.opensaml" level="DEBUG" />
<Logger name="org.springframework.security.saml" level="DEBUG" />
<Logger name="com.iobeya.auth.saml" value="DEBUG" />
<Logger name="org.springframework.security.web.authentication.SimpleUrlAuthenticationFailureHandler" value="DEBUG" />
2.2. SAML Tracer
Finally, the use of SAML Tracer addon (for firefox or chrome) is highly recommended to troubleshoot the setup of the SAML connexion (to be installed by a person who is supposed to test SSO connexion). With it you will quickly see if there are attributes in the SAML response and the names of the attributes you need to complete the iObeya SAML configuration.
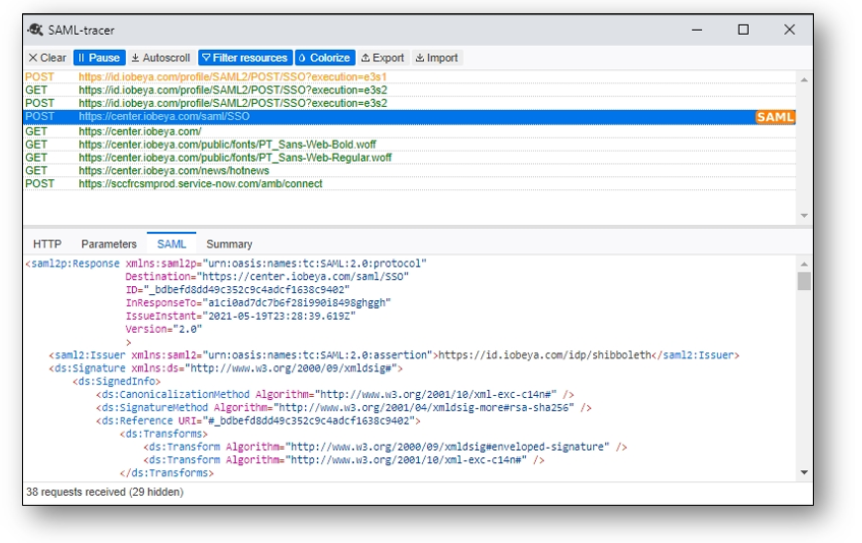
Here is an example where the fields are not mapped as it could naturally be (attribute name defines the email) :
Note If assertion encryption is activated on the IDP, you will not be able to read the attributes that are passed in the assertion in SAML Tracer. |
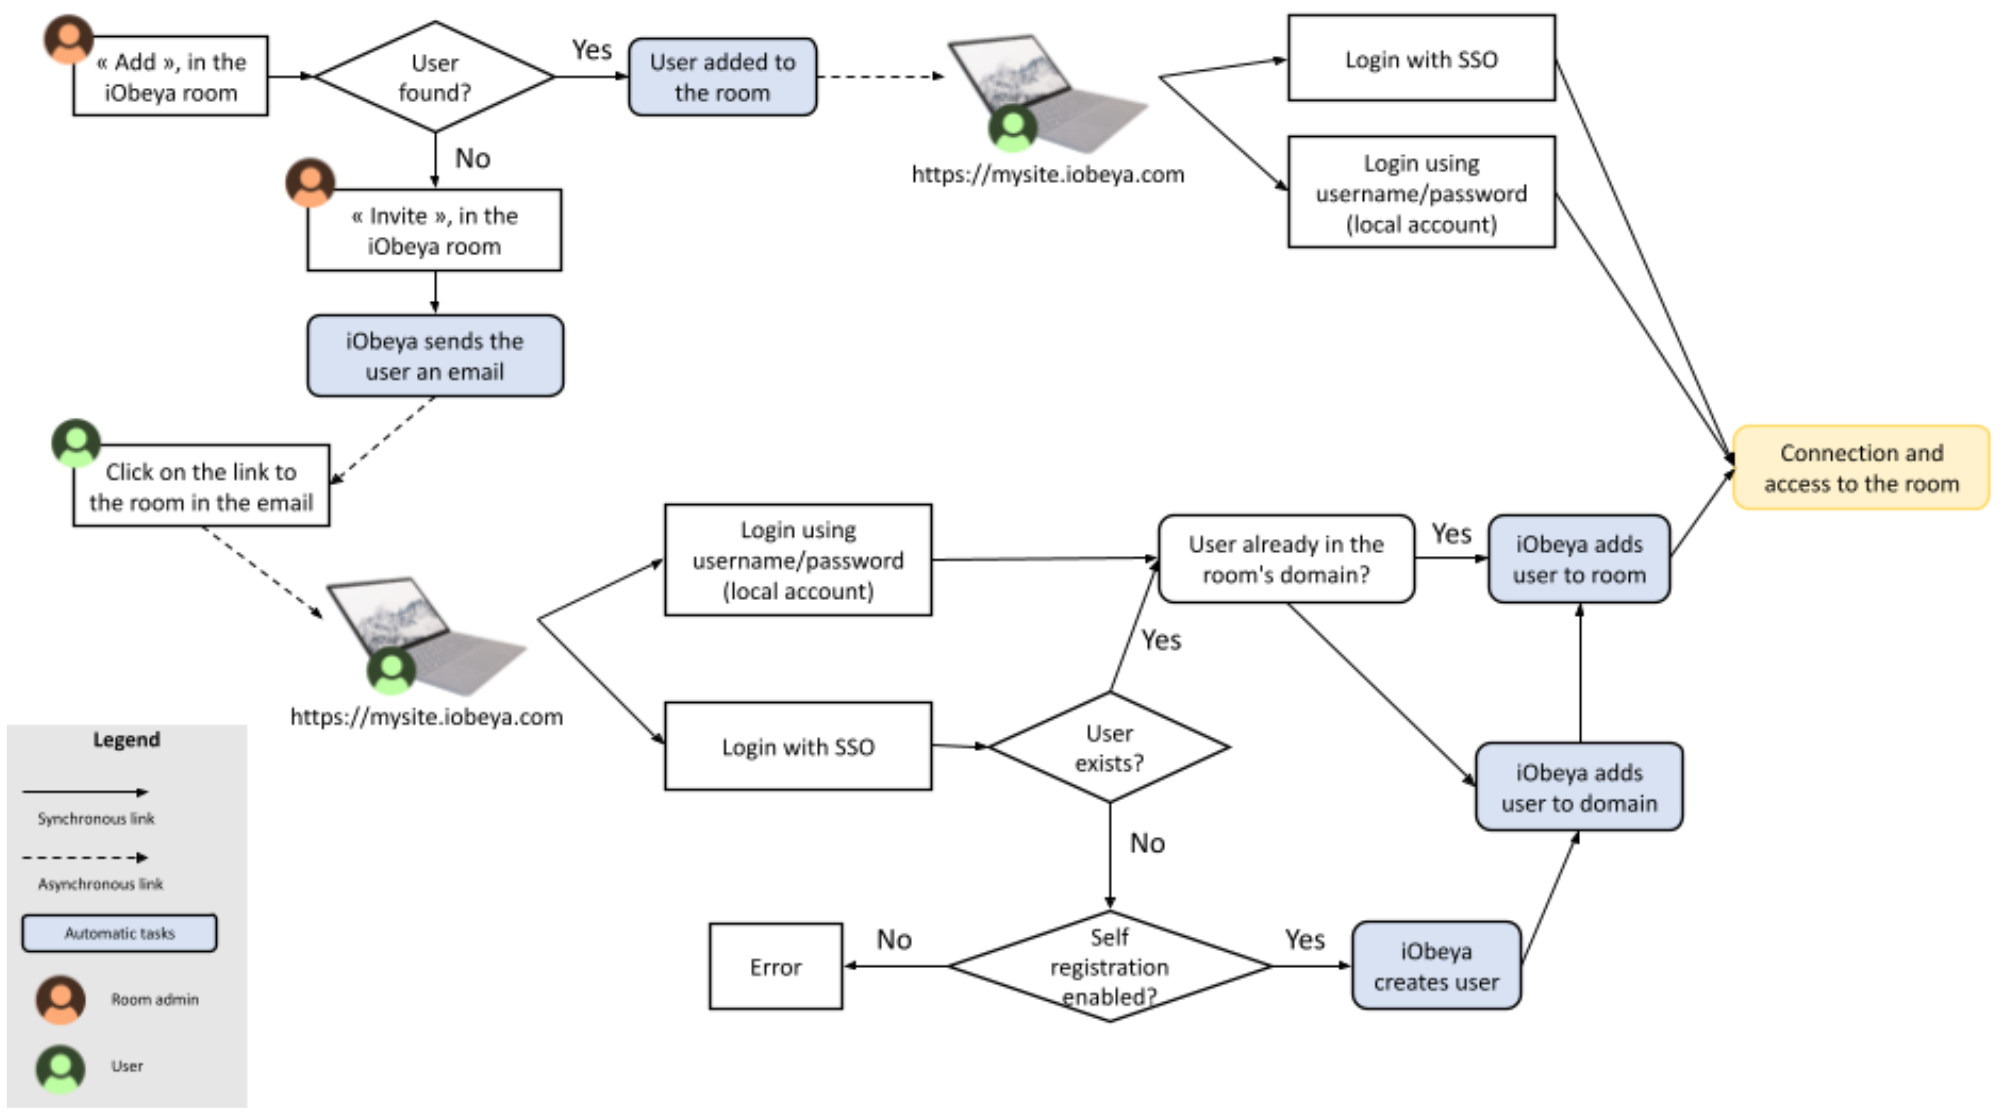
2.3. How a SSO login is embedded in the workflow of user added in a room