Easily insert data into QCD Letters
(a combinaison of PowerAutomate, Excel/CSV-file, Button & QCD)

Feeding data into QCD Letters is critical to enable teams to see how they are doing, comparing trends over time, across teams, locations, regions, etc. Data entry starts the information flow for the performance dialogue.
While this can be done manually as part of the performance dialogue, as your organization grows and depends on more indicators, updating them manually gets time consuming. Additionally data is already available in other systems that you would like to load easily into the QCD Letters.
With the version 4.31 of iObeya, you now have the ability to import complete Excel spreadsheets to populate indicators of letters of different board and rooms through the iObeya Services Hub. And you can even automate the upload process through the API that comes with the iObeya Services Hub.
There are many ways to from Excel to iObeya. Here is a quick diagram showing different solutions, manual or automatic and with different tools and technical enablers. The data journey is the same: data is filled in Excel and is injected in QCD indicators.

The best scenario depends on the business needs, your IT constraints, capabilities and the autonomy you want to provide to end users. The path we are describing in this article is highlighted in red in the diagram above.
This article explains how to automate your data import so that indicators are up to date based on values filled in Excel.
Design and Implementation
As usual, we use the Power Automate platform provided by Microsoft and available in an O365 professional account. Here is an overview of the flow we want to build:
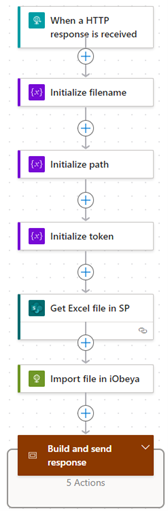
First, the flow needs a trigger. It can be a manual one but the most interesting for this example is to start with a “When a HTTP is received” trigger. Thanks to that, the flow can be triggered by calling a URL. What is really nice about this type of Power Automate action is that it allows a user to configure a simple iObeya button that triggers the Excel integration!
It is also possible to imagine a generic flow which uses a dynamic Excel file name so users can use their own; possibilities are endless, and it is up to the creator of the flow who will do the implementation (based on users need obviously) to design the best solution.
So here, let’s see how to implement such a scenario:

To summarize, we want
- To provide a way for an end user to trigger the integration from an iObeya board
- To give the ability to the end user to specify the Excel file to be used for the integration scenario
- Obviously, to inject automatically an Excel file in iObeya
Flow detailed
As usual, it is very important to keep in mind that everything here is provided as an example. For production use cases, this information must be challenged based on given needs, constraints or business rules and the implementation proposed challenged based...
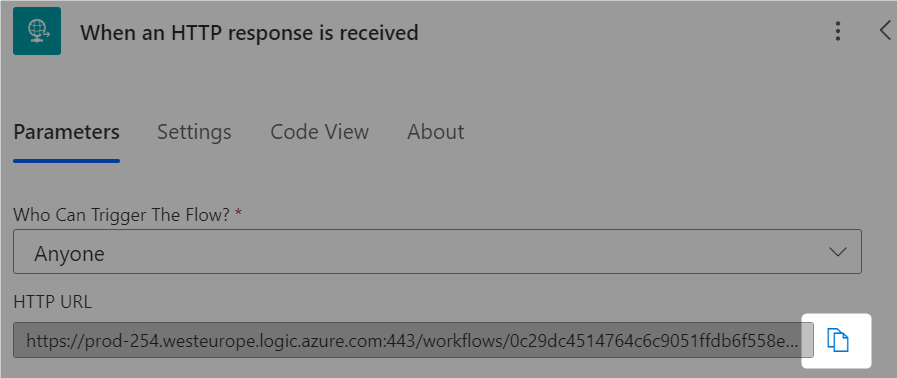
First step: trigger the flow with Instant cloud flow and select the trigger “When a HTTP request is received”

- Copy paste the value in the HTTP URL field, that will be the one we will put in the button URL on iObeya side
Then, add a SharePoint action “Get file content using path”
- Select a SharePoint site
- The File Path would be dynamic here: add the value to target the folder where the Excel is and append a variable. Select the Queries parameter of the Trigger and add [‘filename’] at the end of it. The complete value will be triggerOutputs()[‘queries’] [‘filename’]
Finally, call the iObeya API to import the Excel file. This is the critical part, we have here to reproduce a call to the corresponding QCD import file end point. Because this end point waits for a file in parameter, we need to make it understandable by Power Automate.
- Add a new action “HTTP” (Note that it is a premium connector, it is mandatory to have a Power Automate license that allows to run flows that use this kind of connector)
- URL: [IOBEYA_API_BASE_URL]/v1/services/qcd/importfile
- Method: POST
- Headers:
- Add a new row with the parameter Authorization and the value Bearer followed by the value of a token (check this article or this one to know how to generate a token). Note: for better maintenance, this value can be stored in a dedicated variable before.
- Body: copy paste the following content
-
{
"$content-type": "multipart/form-data",
"$multipart": [
{
"headers": {
"Content-Disposition": "form-data; name=file; filename="
},
"body":
},
{
"headers": {
"Content-Disposition": "form-data; name=canChangePeriod"
},
"body": "true"
}
]
} - After the parameter filename=, add the same dynamic variable that references the filename sent as a parameter
- And after the parameter body:, add a dynamic variable that will be the result of the SharePoint action: body('Get_Excel_file_in_SP')
- Last thing, the last parameter drives the option canChangePeriod. Change the body value of this level to false if you don’t want to use it
-
- At the end, the parameter of this action should look like this:

Last but not least, add a “Response” action to send an acknowledge to the browser. Put the value 200 in the Status code of the action to simplify this step.
Configure a button in iObeya
As mentioned above, this step is not mandatory and depends on the way the flow is triggered. In this example, we used a manual trigger so we can get the corresponding URL by clicking on this button:
Paste this value in the URL field of an iObeya button.
Now, thanks to the way the flow has been designed, it is possible to inject the name of the Excel file we want to import. So at the end of this URL, add the value &filename= + the value representing the name of the Excel file.
Example of a complete URL could be something like https://prod-254.westeurope.logic.azure.com:443/workflows/0c29dc45ffdb6f558e07/triggers/manual/paths/invoke?api-version=2016-06-01&sp=%2Ftriggers%2Fmanual%2Frun&sv=1.0&sig=w40FkMlATcKnN-2f1W0umFiI-jb0rlcn9NYyGl5NmSU&filename=myfile.xlsx
Difference between the existing Excel import article
As already mentioned, there are several possibilities to inject values stored in an Excel file.
For instance, an article of our Resource Center named “Empower iObeya QCD with Excel import via Power Automate” also explains how to import Excel values. The result is the same – QCD indicators are automatically populated – by the process is completely different.
First, the structure of the imported files is different in the two articles. It is directly linked to the API behind these Power Automate actions that are not the same, so the expected data (the body / the payload) is a bit different. That is why in the article mentioned above, it explains how to parse the file row per row in order to be able to compute indicators in an array first and then, update indicators thanks to a dedicated action of the iObeya connector (which uses the Bulk update indicators values API endpoint). Here, we don’t need that as we use an API endpoint that digests a raw Excel file directly.
Second, because we don’t use the same API endpoints, the way to call them is different. In the mentioned article, it uses the iObeya Power Automate connector that wraps the API calls (so it needs a client ID / client Secret to connect to iObeya, as described in the Getting started article). Here, the call is done by requesting directly the iObeya API, so it uses the Microsoft HTTP connector that takes a token as parameter.

Looking for more ?
- Do you want to learn more about this connector capabilities? Browse the iObeya connector documentation
- You are using another RPA/iPaaS platform than Power Automate? Browse the Facade API documentation to discover the API services used with Power Automate
- Interested to have an overview of the integration capabilities of the iObeya platform? Access the integrations page
If you have any questions or would like more information about using iObeya APIs for your business, please don't hesitate to contact us at integrations-support@iobeya.com.
Our team of experts is available to provide additional guidance and support, and can also offer personalized demonstrations of these powerful tools to help you get the most out of them. We look forward to hearing from you and helping you achieve your business goals with iObeya.
Type of integration
Facade API
Tags
Tools
